GRE PSR-800 · Volume 2
GRE PSR-800 — Vol 2: Operations
P25 EZ Scan handheld with the RadioReference library on microSD (2011)
2.1 About this volume
This volume covers operating the PSR-800 from its own ten-key keypad: getting from a fresh card to first audio, organizing what the radio scans, the three search modes, the weather receiver, the audio recorder, the programmable alert LED, and the discriminator output. GRE designed the radio to be fully functional without a computer. The PC application (Vol 3) adds backups, custom objects, V-Scanner management and updates, but nothing in this volume needs it.
Firmware era matters for programming. The radio shipped in 2011 with a browse, pick and import workflow: the operator walks the on-card Library by state, county and system and imports what is wanted. GRE’s firmware 1.5, announced on 2012-01-11, added Set Location, which builds a scan configuration from a ZIP code, city or county. The owner’s manual in the Reference Library is the 2011 edition filed with the FCC, so it documents only the browse workflow. Both are described below. Hardware, connectors and specifications are in Vol 1; reference tables and error codes in Vol 4; firmware, upgrades and what the radio cannot decode in Vol 5.
2.2 The object model
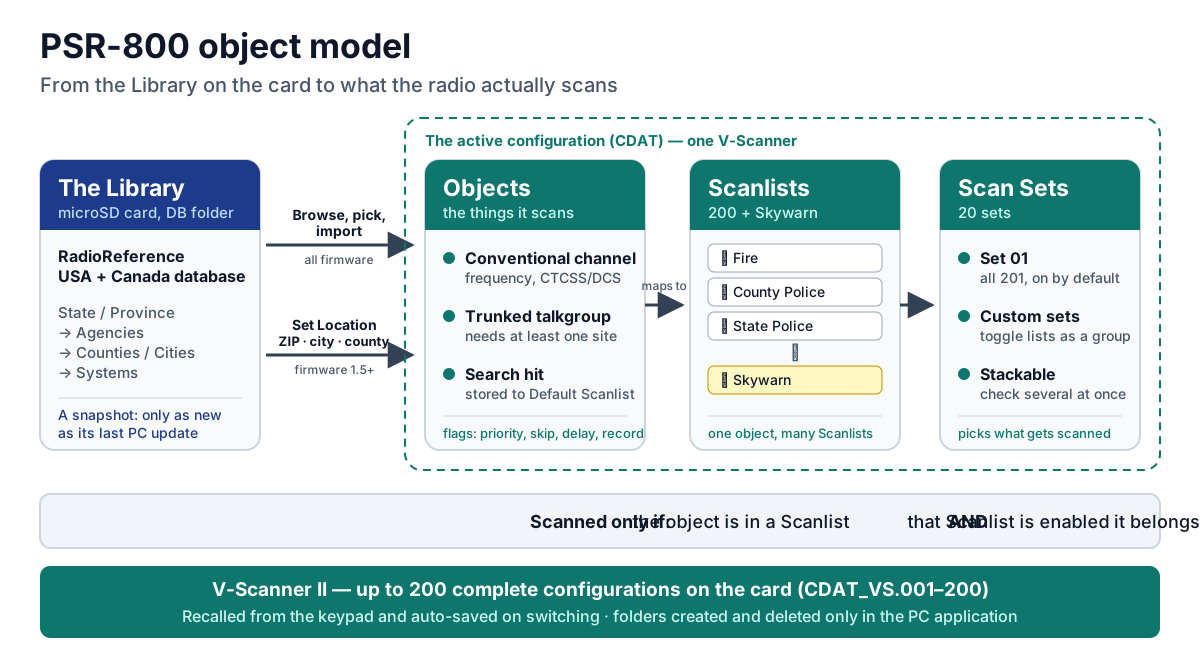
GRE built the PSR-800 around an object-oriented database inherited from its PSR-500/600 line. Three layers decide what the radio scans:
- Objects are the things monitored: a conventional channel (a frequency, with its CTCSS or DCS code where known), a trunked talkgroup (which depends on at least one site of its system), or a frequency found by a search. Each object carries its own flags for priority, skip or lockout, delay, recording, attenuation, digital AGC and alerts.
- Scanlists group objects. There are 200 regular Scanlists plus one Skywarn Scanlist, 201 in all. One object can be mapped to as many Scanlists as desired, so a county’s fire channels can sit in a “Fire” list and a “North District” list at once.
- Scan Sets group Scanlists. There are 20. Scan Set 01 contains all 201 Scanlists and is enabled by default, which is why a new radio behaves as though Scan Sets do not exist.
GRE’s manual states the rule exactly: an object is scanned when it is mapped to a Scanlist, and that Scanlist is enabled, and that Scanlist is a member of at least one enabled Scan Set.
Everything above lives in the active configuration on the microSD card. V-Scanner II stores up to 200 complete configurations in folders CDAT_VS.001 to CDAT_VS.200. From the keypad, Main Menu → V-Scanner selects one; the radio saves the current configuration automatically before loading the new one, so there is no separate save or load step. V-Scanner folders cannot be created or deleted in the field. All folder creation and management happens in the PC application (Vol 3).
2.3 Controls and display
2.3.1 The keypad
The keypad is backlit and has ten keys. There is no numeric keypad; frequencies, names and codes are entered by scrolling characters with the arrow keys.
Table 1 — The keypad
| Key | While scanning or monitoring | In menus and the Library | Elsewhere |
|---|---|---|---|
| POWER | Hold 1 s for on/off; brief press toggles backlight | — | — |
| MENU | Opens the menu for the current mode (Object Menu when stopped on an object) | Returns toward the Main Menu | Library special menu (Import Selected); Playback options |
| SKIP | Skips the active or selected object; press again to restore | Cancels a pending change | Stops playback; in Weather mode toggles SAME Standby; in text entry clears from the cursor right |
| ▶/II/SEL | Scan / pause | Selects, checks or unchecks | Plays a recording |
| UP / DOWN | Volume | Scroll items | Playback volume |
| LEFT / RIGHT | Resume scanning without skipping the object | Back out / drill in | Jump 5 s back / forward in playback |
| ATT | Cycles per-object attenuation → global attenuation mode → global attenuation on | — | — |
| WX | NOAA Weather Radio | — | Second press selects the Skywarn Scanlist alone |
The 2011 manual documents no keypad-lock function. Set Password in the Main Menu sets a power-on password, but GRE notes that anyone with the PC application can reset it, so it deters casual use only.
2.3.2 Squelch
Squelch is the only rotary control, on the top panel. GRE recommends the 10 to 11 o’clock position. Fully clockwise passes only strong signals; fully counterclockwise holds the gate open and makes the radio stall on empty objects. If transmissions are missed, turn it counterclockwise; if scanning crawls or stops on noise, turn it clockwise.
2.3.3 The display
The LCD is a backlit 132 × 65 dot matrix. While scanning it shows a scrolling list of enabled Scanlists with attenuator and control-channel status. When it stops on an object it shows the object display, whose content depends on Simple Display in the Settings menu. Simple Display is on by default and shows only object, Scanlist and system names. It must be turned off to see frequencies, talkgroup IDs, radio IDs, site names and found CTCSS/DCS codes, each of which then has its own Show setting.
On the right of the object display, four characters give the object’s state:
Table 2 — On the right of the object display, four characters give the object's state
| Position | Lowercase | Uppercase |
|---|---|---|
| p | priority off | P priority on |
| s | skip off | S skipped; L locked out |
| d | delay off | D delay on |
| r | recording off | R recording on |
So pLDr is an object that is locked out with delay on.
The icon row across the top reports receiver state:
Table 3 — The icon row across the top reports receiver state
| Icon | Meaning |
|---|---|
| Squelch / signal meter | Squelch gate open; relative signal strength |
| IF | Discriminator output active |
| Control-channel icon | Receiving trunking control-channel data, or flashing for low-speed data embedded on a voice channel |
| Attenuator icons | Global mode set; attenuator active; global attenuation on |
| AM, FM, NF | Analog mode: AM, FM, narrow FM |
| DG / Dg | P25 digital audio with / without digital AGC |
| D2 | P25 Phase II voice (firmware U1.8 and later, per GRE’s release notes) |
| E | Encrypted digital traffic detected |
| ▶ / II | Scanning / paused on one object |
| Record icon / F | Recording; recording enabled but suspended because the card is nearly full |
| Battery / external power | Charge state (animated while charging NiMH); running on external power |
Encrypted calls. The radio detects encryption and never decodes it. The EncMode setting chooses what is heard during an encrypted call: Noise (the undecoded audio), Silent, or Tone (a soft tone for the call’s duration, level set by EncLevel).
2.4 First audio
2.4.1 Before powering on
- Open the battery door (press OPEN and slide down). Set the ALK/NiMH switch to match the cells. Never leave it at NiMH with alkalines installed; on external power the radio would try to charge them.
- Insert four AA cells. With NiMH, charge for about 16 hours with the radio off on USB power (Vol 1).
- Confirm the microSD card is seated under the “MICRO SD” label, then close the door.
- Fit the antenna to the BNC jack: align, push, turn a quarter turn clockwise.
- Set squelch to 10–11 o’clock. Hold POWER for one second. On first power-up the radio asks for the date and time.
2.4.2 Workflow A: Set Location (firmware 1.5 and later)
GRE’s 2012 firmware 1.5 release describes “set-location” programming: the operator chooses a location by ZIP code, city or county, then the service types wanted, and the radio builds its Scanlists from the Library with no PC or internet connection. The Whistler WS1080 manual, for the same platform, documents the result as pre-named Scanlists numbered from 151 upward, such as “Multi Dispatch” and “Law Tac”.
The exact PSR-800 menu wording for Set Location is not in the 2011 manual and could not be confirmed from another primary source. On a radio running 1.5 or later, the sequence is: Main Menu → Set Location → choose ZIP, City or County → enter or pick the location → choose services → press ▶/II/SEL to scan. Check the result in Browse Objects before relying on it, and see Vol 5 for how to read the firmware version.
2.4.3 Workflow B: Browse, pick and import (all firmware)
This is the method GRE’s manual teaches, and it is available on every firmware version.
- Browse. Main Menu → Browse Library. Choose the country, then the state or province. Three branches follow: Agencies (statewide users such as state police, emergency management, parks), Counties/Cities (local systems), and Systems (statewide trunked systems). Inside a county there are again Agencies, Categories and Systems; public-safety conventional channels usually sit under Categories. RIGHT drills in, LEFT backs out.
- Pick. Checkboxes appear once the listing reaches pickable items. ▶/II/SEL checks an item, or a whole grouping at any level. A code in place of the checkbox means the item cannot be picked:
Table 4 — 2. Pick. Checkboxes appear once the listing reaches pickable items. ▶/II/SEL checks an item, or a whole grouping at any level. A code in place of the checkbox means the item cannot be picked
| Code | Meaning |
|---|---|
| D | Unsupported digital modulation (for example DMR or NXDN on an unupgraded radio) |
| S | Unsupported system type |
| F | No sites or frequencies in the database for this entry |
- Mind trunked-system sites. A talkgroup cannot be imported unless at least one site of its system is also picked. Checking the system name picks every site and talkgroup, and the radio then finds the best site itself. To be selective, drill into the system: pick nearby sites under Sites and wanted talkgroups under Categories. Fewer sites give the radio less work and faster operation.
- Import. Press MENU in the Library, choose Import Selected, check the destination Scanlists, and press RIGHT to start. Large imports take several minutes. The Default Scanlist is always pre-selected; uncheck it unless that is intended. The Default Scanlist is set in Settings → Default SL.
GRE’s advice is to start with small imports. The radio monitors one transmission at a time, and a configuration with whole states imported is busy all the time.
2.4.4 Keeping imported objects in step with the Library
Main Menu → Update from Library rewrites every programmed object with the current Library data on the card, picking up renamed talkgroups or changed CTCSS codes. The radio refuses to start it unless it is on external power, the job can take a long time, and GRE warns that interrupting it can corrupt data. It can only be as current as the Library on the card, and keeping that Library current is now difficult (Vol 3).
2.5 Scanlists and Scan Sets
Scanlists. Main Menu → Scanlists lists all 201. ▶/II/SEL enables or disables one; RIGHT renames it (the PC application can also rename). Descriptive names make everything else easier.
Scan Sets. Main Menu → Scan Sets lists the 20 sets. GRE’s recommended way to start using them:
- Leave Scan Set 01 containing everything, but disable it.
- In Scanlists, enable all Scanlists, so the Scan Sets alone decide what is scanned.
- For each custom set: RIGHT to rename, then MENU to choose member Scanlists with ▶/II/SEL, then MENU to return.
- To scan, check one or more sets. Sets stack.
Disabling a single Scanlist in the Scanlists menu still removes it from every set until it is re-enabled.
2.6 Scanning, pausing and skipping
- Scan. Main Menu → Scan (RIGHT or ▶/II/SEL) scans all active objects that pass the rule above.
- Pause. ▶/II/SEL while stopped on an object holds it; press again to resume.
- Resume without skipping. LEFT or RIGHT abandons the current transmission and resumes scanning, but the object stays active.
- Skip. SKIP marks the object skipped (
S). Main Menu → Restore Skipped clears all skips; SKIP on a browsed object clears one. - Lock out. A lockout (
L), set in the Object Menu, survives Restore Skipped. - Monitor while browsing. Main Menu → Browse Objects; UP/DOWN walks objects and LEFT/RIGHT walks Scanlists. ▶/II/SEL monitors the selected object; a second press scans all enabled Scanlists.
- Priority. Enable Priority Mode in Settings, then flag objects Priority (
P) in the Object Menu. Priority Time sets how often conventional priority objects are checked. - Delay. A per-object 2-second hang time after each transmission for replies (
D).
The Object Menu is reached with MENU while browsing an object or while stopped on one. It holds Alpha Tag, Set Scanlists, Locked Out, Skipped, Priority, Delay, Attenuate (not offered for trunked talkgroups), AGC (digital AGC, useful for levelling P25 users), Alarm, Light, flash and LED settings, Record, and Delete Object. Deleting an object removes it from the configuration only; the Library is never altered, so it can be imported again.
2.7 Searches
All three search modes are under Main Menu → Search. SKIP blocks an unwanted hit. Found frequencies can be stored to the Default Scanlist, and Search Record in Settings records transmissions found while searching.
2.7.1 Spectrum Sweeper
Spectrum Sweeper is GRE’s near-field search, comparable in purpose to Uniden’s Close Call. It sweeps enabled ranges in 1 MHz blocks looking for strong nearby signals and tunes to any it finds. It has two modes: All Bands and a faster Public Safety mode.
Table 5 — Spectrum Sweeper
| All Bands range | Service | Public Safety range |
|---|---|---|
| 25–54 MHz | VHF low | 33.4–46.5 MHz |
| 108–137 MHz | VHF aircraft | — |
| 137–174 MHz | VHF high | 151–170 MHz |
| 216–300 MHz | 220 MHz commercial/amateur | — |
| 300–406 MHz | UHF military air | — |
| 406–470 MHz | UHF | 453–467 MHz |
| 470–512 MHz | UHF-T | — |
| 764–782 and 791–797 MHz | 700 MHz | 764–782 and 791–797 MHz |
| 806–869 MHz | 800 MHz | 806–869 MHz |
| 894–1300 MHz | 900 MHz and 23 cm amateur | — |
MENU while sweeping opens the options:
- Attenuator shortens the effective range and helps near strong transmitters.
- Zeromatic centres the receiver on the exact frequency of a hit.
- Delay adds a 2-second wait for replies.
- Special Mode skips any 1 MHz block in which five or more frequencies have been skipped. This is useful beside dense high-power sites.
- Frequency Ranges enables or disables individual ranges. Fewer ranges make the sweep faster.
Cancel Changes and Save Changes leave the menu.
2.7.2 Service Search
Service Search scans predefined allocations. It offers Public Safety (VHF low, VHF high, UHF, 700 MHz, and 851–869 MHz), Aircraft (108–118 navigation, 118–137 civil voice, 138–150 and 225–400 military voice), Railroad (AAR VHF channels), Amateur (10 m, 6 m, 2 m, 1.25 m, 70 cm, 33 cm and 23 cm), CB, Marine, and FRS/GMRS/MURS (including DOT and STAR channels). Its menu has the same Attenuator, Zeromatic and Delay options. Zeromatic has no effect in the channelized searches (CB, Marine, FRS/GMRS/MURS). Frequency Ranges applies to the Public Safety, Aircraft and Amateur searches.
2.7.3 Limit Search
Limit Search covers a custom range set with Lo and Hi in its menu, with the same Attenuator, Zeromatic and Delay options.
2.7.4 Finding and storing a CTCSS or DCS code
Library imports carry the database’s CTCSS/DCS code. Where the code is unknown, the channel is programmed to search for one. When a code is found it appears on the bottom line with an S suffix, for example CTCSS 127.3 S. Pressing MENU then offers Store sq code as the first item. Storing it makes the channel open only for that code. Simple Display must be off to see and store found codes.
2.8 Weather
- Weather Monitor. WX tunes NOAA Weather Radio; UP/DOWN chooses the strongest of the seven channels (the display shows, for example,
WX7). - Weather Priority. In Weather Monitor, MENU → Priority → choose that channel number. While scanning, the radio then samples it periodically for the 1050 Hz Warning Alert Tone and, if the tone is present, sounds an alarm and switches to the broadcast. Set Priority to OFF to disable it.
- Dedicated SAME Weather Alert Receiver. The radio sits silent on the weather channel until a SAME alert matches a stored location. Up to 10 FIPS location codes are stored, each with a tag name and an Enable flag (Weather Monitor → MENU → SAME n Tag / SAME n FIPS / SAME n Enable). A FIPS code is six digits: sub-area, state, county. Dallas County, Texas is
048113, and 0 acts as a wildcard, so048000takes any Texas alert the transmitter carries. With no codes entered, the radio alerts on every SAME message. In Weather Monitor, SKIP toggles SAME Standby. - Skywarn. The dedicated Skywarn Scanlist holds storm-spotter repeaters and similar severe-weather objects. It scans like any other list. Pressing WX again from Weather Monitor scans only the Skywarn list and temporarily disables the rest.
GRE’s manual cautions that the supplied flexible antenna is a general-purpose compromise. A radio relied on as the only weather-alert receiver needs a verified clear signal, or an external antenna.
2.9 Audio recorder and playback
Recording is off by default. It needs two settings: Enable Record in Settings, plus the Record flag on each object to be captured. Recording every object gives an instant-replay buffer for traffic that was missed or unreadable. Transmissions are written to the card’s REC folder as .AU files, time-stamped by the internal clock. GRE rates a 2 GB card holding a large 500 MB configuration at over 50 hours of recording. The record icon flashes while recording. F means the card is nearly full and recording is suspended.
Main Menu → Playback opens at the most recent file:
- ▶/II/SEL plays the file.
- UP/DOWN chooses files and, during playback, sets volume.
- LEFT/RIGHT move 5 seconds back or forward.
- SKIP ends the current file and moves to the next when playing several.
MENU in Playback offers Back, Play From Here (this file and everything after it), Delete All, Delete Earlier (files before the selected one) and Delete Later (the selected file and everything after it). Select the marker file before either Delete option. The PC application also plays and manages recordings (Vol 3).
2.10 Alert LED, backlight and alarms
Every object can announce itself in three ways: an audible Alarm, the backlight, and GRE’s tri-colour Alert LED on the top panel. (RadioShack’s PRO-18 twin lacks the LED.)
- Light is Leave (use the global backlight settings), On, or Flash.
- Flash Pattern is a 32-step pattern written as eight hex digits. Each digit is a four-step block, from
0(all off) toF(all on), so5is off-on-off-on and8is on-off-off-off. - On Time and Off Time set each step’s duration in 10 ms units; 50 is half a second.
- LED Enable lights the LED in Color 1 when the object is active. LED Flash makes it follow the Flash Pattern.
- Color Count (up to 4) and Color 1–4 are RGB hex values (
FF0000red,0000FFblue,FFFF00yellow,FFFFFFwhite). Each new “on” step shows the next colour.
Table 6 — Alert LED, backlight and alarms
| Effect (from GRE’s Appendix A) | Pattern | On / Off | Colours |
|---|---|---|---|
| Default slow flash, 1 Hz | 55555555 | 50 / 50 | one |
| Half second every two seconds | 88888888 | 50 / 50 | one |
| ”Highway Department 1” strobe | A8A8A8A8 | 5 / 9 | yellow |
| ”Police Department 3” strobe | AAAAAAAA | 5 / 9 | blue, red |
| ”Fire/EMS 1” flasher | AFAFAFAF | 5 / 1 | red, white |
Global behaviour lives in Settings:
- Sounds: On or Stealth.
- Alerts: Both, Audio, Visual or Off.
- Key Beeps, Beep Volume and Alert Volume.
- LModeBAT and LModeEXT: backlight On, Stealth, Normal, Key or Ignore, set separately for battery and external power.
- LiteArea: LCD, keypad or both.
- LiteTime and LiteLevel: LiteLevel sets both backlight and LED brightness.
- Use RID Alert!: fires alerts tied to specific radio IDs.
2.11 Discriminator output and control-channel data
The radio has a built-in discriminator tap, so no case modification is needed. Settings → IF Out routes the unsquelched, unfiltered discriminator signal to the headphone jack (HP) or to the jack and the speaker (HP/SP). Off returns normal operation. The IF icon shows when the output is active. GRE named Unitrunker, Trunk88 and Treport as the kind of decoding software it feeds. The jack takes a 1/8-inch (3.5 mm) mini-plug; decoding software then takes the signal through a computer’s audio input.
Separately, PC/IF CCDump streams ASCII control-channel data over USB whenever the radio sits on a trunking control channel. M36 Status Bits controls whether Motorola 3600-baud status bits are used in talkgroup tracking.
2.12 Clock, alarm and password
The real-time clock stamps recordings. It is set at first power-up, from Main Menu → Set Clock, or over USB from the PC application. It is lost if the batteries run flat or are out for more than a few minutes. GRE’s feature list also describes an “alarm clock” that wakes the radio to scan at a set time each day; the 2011 manual does not document where it is configured. Set Password is covered under the keypad above.
2.13 Attenuator
The attenuator works at three levels. Per object, it is the Attenuate flag in the Object Menu (conventional objects only). Globally, G Atten Mode makes the ATT key’s global state override every object and search, and G Atten On switches it in. The ATT key cycles through all three states. Each search mode has its own Attenuator option.
GRE’s troubleshooting advice applies equally to weak and strong signals: compare reception with the attenuator in and out, and keep whichever is better. The attenuator suits a radio overloaded by a nearby transmitter. It hurts reception of distant stations.
Digital audio levels have a parallel control. AGC per object, plus G AGC Mode and G AGC On, level P25 voice from different radios, and Search Dg AGC does the same for digital hits found while searching.
2.14 Field use
Antenna. The BNC jack takes any 50 Ω antenna. GRE suggests an external mobile or base antenna, or antennas tuned to specific bands, over RG-58 or lower-loss RG-8 coax, with a BNC adapter where needed. Outdoor antennas need grounding and a lightning arrestor per NEC Article 810. For antenna selection, see the peer Antennas project.
Batteries and power. Four AA cells, with the switch set correctly:
- The internal charger works only with the radio off. With the radio on, USB power runs it but does not charge.
- A low-battery beep sounds every 30 seconds. At critical level the radio shuts itself down to protect the card.
- “Scanning not available” means the battery is too low for card writes, and scanning stops with them.
- GRE gives no battery-life figure. Owner reports describe noticeably short run time, with around 10 hours cited on high-capacity NiMH cells; these reports are unconfirmed.
- Always power off from the front panel before connecting or disconnecting external power and before opening the battery door. Either act with the radio on risks corrupting the microSD card.
Noise sources. Some USB power supplies, PCs and vehicle charging adapters inject RF noise. If reception degrades on external power, move the radio away from the PC or run on batteries.
Overload. The RadioReference wiki describes this family as highly sensitive but easily overwhelmed by strong nearby signals. The later TRX series is reported to have added front-end filtering for that reason, though its published specifications are unchanged and owner comparisons are mixed. Near paging, broadcast or trunked-site transmitters, use the attenuator or Special Mode in Spectrum Sweeper.
Birdies. Internally generated signals exist on every scanner. If a channel carries steady noise, remove the antenna. Noise that remains is a birdie; noise that disappears is external.
Environment. The radio is not waterproof. GRE’s operating range is −10 to +60 °C. It is a pocket and belt radio for dry conditions.
2.15 Downloads and manuals
Table 7 — Downloads and manuals
| Document | Covers |
|---|---|
| GRE PSR-800 Owner’s Manual | 2011 edition as filed with the FCC (FCC ID ADV0602902): controls, Library browsing, Scanlists and Scan Sets, searches, weather, recording, alert LED, menu reference, troubleshooting, specifications |
All PSR-800 documents in one list: Reference Library — GRE PSR-800.
Sources
- GRE America, GRECOM PSR-800 EZ Scan-SD Digital Handheld Scanning Receiver Owner’s Manual (2011), FCC ID ADV0602902 exhibit — keypad, display and psDr indicators, Library browsing and checkbox codes, Scanlists and Scan Sets, V-Scanner II, searches, weather, recording, Object/Settings/Playback menus, alert LED Appendix A, troubleshooting: https://fccid.io/ADV0602902
- GRE firmware 1.5 “Set-location” press release (2012-01-11): https://www.24-7pressrelease.com/press-release/256245/gre-releases-major-firmware-update-for-grecom-psr-800
- Whistler WS1080/WS1088 user manual (same platform; Set Location and pre-named Scanlists): https://www.manualslib.com/manual/1104556/Whistler-Ws1080.html
- RadioShack PRO-668 user guide (ManualsLib): https://www.manualslib.com/manual/1080355/Radio-Shack-Pro-668.html
- RadioReference wiki, PSR-800 and GRE PSR-800 based scanners (display, overload, family): https://wiki.radioreference.com/index.php/PSR-800 · https://wiki.radioreference.com/index.php/GRE_PSR-800_based_scanners
- RadioReference forums, PSR-800 firmware U1.8 thread (D2 Phase II indicator): https://forums.radioreference.com/threads/psr-800-firmware-u1-8.258037/
- RadioReference forums, owner battery-life reports: https://forums.radioreference.com/threads/gre-psr600-psr800-review-from-a-uniden-junkie.297537/
Comments (0)